Easily customize your checkout page by adding, removing, or modifying fields to better meet your businesses needs. You can streamline the checkout process and gather essential customer information with this extension.
Note:
This extension is not yet compatible with the Cart and Checkout blocks.
Installation
↑ Back to topThe easiest way to start using a product from qphmycoi.top is to use the “Add to store” functionality in the order confirmation page or the My Subscriptions section in your account.
- Navigate to My Subscriptions
- Find the “Add to store” button next to the product you’re planning to install
- Follow the instructions on the screen, and the product will be automatically added to your store.

Alternative options and more information at: Managing qphmycoi.top subscriptions.
Setup and Configuration
↑ Back to topGo to: WooCommerce > Checkout Fields.
Fields
↑ Back to topThere are three sets of Fields you can edit:
- Billing — Payment and billing address section of checkout (payment must be enabled)
- Shipping — Shipping section of checkout (shipping must be enabled)
- Additional — Appear after the billing and shipping sections of checkout, next to order notes (order notes must be enabled)

Columns
↑ Back to top- Name — Name of field, which is used as the meta key to save info. Must be unique.
- Type — Field type. See ‘Types’ below.
- Label — Label for input shown in checkout.
- Placeholder / Option values — Placeholder text for inputs OR the options for select boxes, radios etc. Values should be separated by a pipe
|. Two scenarios are explained below:- An options list starting with a pipe creates an empty choice. Used with a required select field, it will force the user to choose a valid option.
- An options list without a pipe as first character will make the first option in the list the default choice, whether the field is required or not.
- Position — Left, right or full width. This applies CSS styling to the box.
- Validation rules — Choose validation rules to apply: Email, number, and required are supported.
- Display Options — Options to display fields in Emails. This includes all customer and admin order emails where the address information would be displayed, or Order detail pages which includes any pages displaying order information, such as the “Thank You” page and “My Account” pages on the frontend, and the admin “Edit order” screens.
Types
↑ Back to topThese custom types are supported:
- Text — standard text input.
- Password — password text input.
- Textarea — A textarea field.
- Select — A dropdown/select box. Requires options set.
- Multi-select — A multi-select box. Requires options set.
- Radio — A set of radio inputs. Requires options set.
- Checkbox — A checkbox field.
- Date picker — A text field with a JavaScript data picker attached.
- Heading — Adds a heading to allow separating fields into groups.
Editing core fields
↑ Back to top
In the Billing and Shipping sections, there are core fields highlighted in purple.
Note:
Disabling or modifying core fields can cause unexpected results with some plugins; we recommend against whenever possible.
Disabled fields
↑ Back to topSome core fields have options disabled and cannot be changed:
- Names of core fields
- Types of special core fields (country and state)
- Fields that change dynamically based on the chosen country of a user (address 1, address 2, city, state, postcode) cannot have custom validation rules, e.g., required fields are determined by locale, not by your settings.
With those limitations in mind, you can:
- Change the labels and position of the fields.
- Disable them by ticking the checkboxes per-row and clicking the ‘Disable/Remove’ button. Disabled fields are then grayed out. Use at your own risk.
Re-enable core fields by checking the rows and pressing the ‘enable’ button.
Adding and editing custom fields
↑ Back to topFrom the bottom of the fields table:
- Select the Add Field button.
- Once a field is added, a blank row appears.
- Enter your text and preferences in the blank row.
- Save Changes.
When you create a custom checkout field, and once an order is placed, this data is included in your WooCommerce order details.
Since it’s saved alongside the other order data, you can export said data as needed. To export custom checkout field data, you will need an extension like the ones shared below.
Export customers, orders, and coupons from WooCommerce manually or on an automated schedule.
Migrate or update all your WooCommerce data with the all-in-one Import Export Suite for WooCommerce.
Resetting checkout fields
↑ Back to topThe Checkout Field Editor extension adds a tool to your WooCommerce settings so you can return checkout fields to their default configuration in a single click. To set your checkout fields back to the default settings:
- Go to: WooCommerce > Status > Tools.
- Find the row titled Checkout Fields.
- Select the Reset Checkout Fields button.
After using this tool, any customizations you’ve made to your fields will be removed.
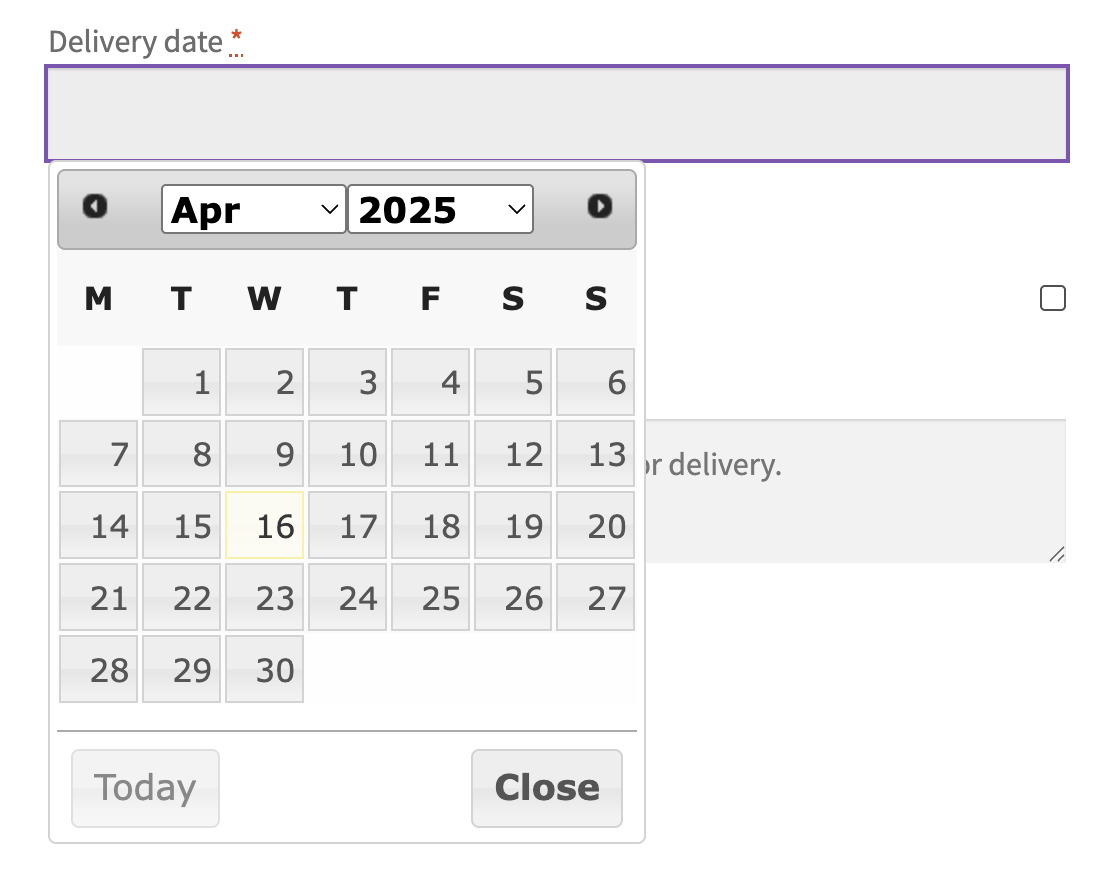
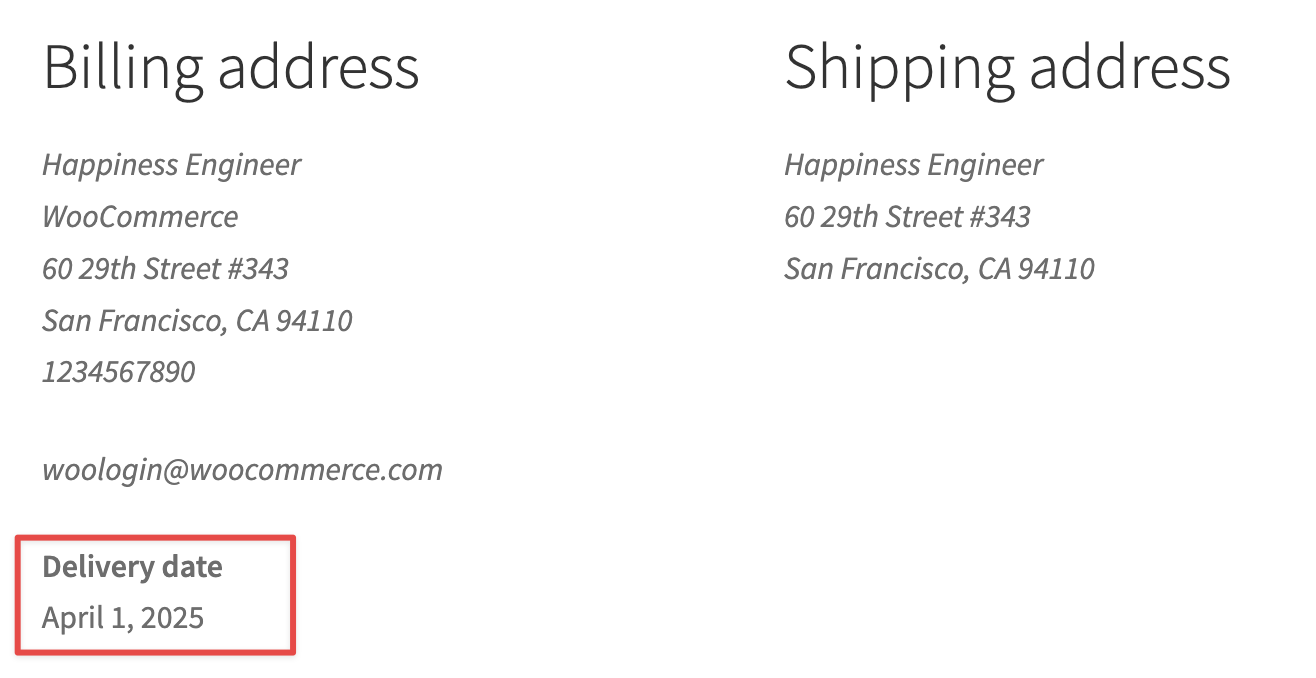
Field display and checking values
↑ Back to topConsider the following example of adding a date picker field. These images below show you the field set up, how it appears at checkout, and then ultimately what you see after placing an order. This field is shown when viewing an order in wp-admin, in emails, and the order details page your customers see.


Customizations
↑ Back to topScope of support:
We are unable to provide support for customizations under our Support Policy. If you need to customize a snippet or extend its functionality, we recommend working with a Woo Agency Partner or a WooCommerce developer on Codeable.
Use a custom field in the WooCommerce emails
↑ Back to topYou can display your custom fields in emails by using the Display Options column when editing your field. If you are using an older version, or using other custom code/emails, you can still use the fields. We have examples of how the fields can be accessed/used via code here: https://qphmycoi.top/document/add-a-custom-field-in-an-order-to-the-emails/
Extending the Date Picker Year Range
↑ Back to topIt is possible to extend the year selection range of the date picker fields by placing the following code in your child theme’s “functions.php” file, or in the designated area of your theme’s “functions.php” file:
function custom_adjust_datepicker_range () {
	if ( is_checkout() ) {
		wp_enqueue_script( 'jquery' );
?>
<script type="text/javascript">
jQuery( document ).ready( function ( e ) {
	if ( jQuery( '.checkout-date-picker' ).length ) {
		jQuery( '.checkout-date-picker' ).datepicker( 'option', 'changeYear', true );
		jQuery( '.checkout-date-picker' ).datepicker( 'option', 'yearRange', '-40:+0' );
	}
});
</script>
<?php
	}
} // End custom_adjust_datepicker_range()
add_action( 'wp_footer', 'custom_adjust_datepicker_range', 50 );
This adjusts the year selector of the date picker to expand by 40 years.
Setting a default value for a radio button field
↑ Back to topIt’s possible to set a default value for a radio button checkout field by placing the following code in your child theme’s functions.php file, or in the designated area of your theme’s functions.php file:
function custom_override_checkout_fields ( $fields ) {
	$fields['billing']['test_radio']['default'] = 'one';
	return $fields;
} // End custom_override_checkout_fields()

add_filter( 'woocommerce_checkout_fields' , 'custom_override_checkout_fields' );
The above snippet assumes that the field is a “billing” field, that the field name is “test_radio” and that the desired default value is “one.”
Add custom fields to Webhooks
↑ Back to top/* WooCommerce - extends WooCommerce Checkout Field Editor */
/* adds additional display areas (Admin edit user screen and WooCommerce Webhooks */
/**
* add custom checkout fields to user profile on admin edit screen
*
* @param mixed $payload
*/
function filter_woocommerce_admin_profile__custom_checkout_fields( $payload ) {
if ( class_exists( 'WC_Checkout_Field_Editor' ) ) {
$fieldgroups = array( 'billing'=>'billing', 'shipping'=>'shipping', 'additional'=>'additional' );
foreach ($fieldgroups as $fieldgroup => $payload_group) {
$fakeorder = new WC_Order();
foreach (wc_get_custom_checkout_fields($fakeorder , array( $fieldgroup ) ) as $field_name => $field_options ) {
//basic validation, is the field enabled
if ( !isset($field_options['enabled'] ) || ( $field_options['enabled'] != true ) )
continue;
//is the field for profile
if ( (!isset($field_options['display_options']) ) || ( !is_array($field_options['display_options'])) || ( !in_array('profile', $field_options['display_options'])) )
continue;
//passed all checks, add to payload
/*'fields' => array(
'billing_first_name' => array(
'label' => __( 'First name', 'woocommerce' ),
'description' => ''
),*/
$payload_value = array(
'label' => $field_options['label'],
'description' => ''
);
if ($field_options['type'] == 'select') {
$payload_value['type'] = 'select';
$payload_value['options'] = $field_options['options'];
}
$payload[$payload_group]['fields'][$field_name] = $payload_value;
}
}
return $payload;
}
};
/**
* filter add for above function
*/
add_filter( 'woocommerce_customer_meta_fields', 'filter_woocommerce_admin_profile__custom_checkout_fields', 10, 1 );
/**
* filter action to add custom checkout fields to the webhook payload
*
* @param mixed $payload
* @param mixed $resource
* @param mixed $resource_id
* @param mixed $this_id
*/
function filter_woocommerce_webhook_payload__custom_checkout_fields( $payload, $resource, $resource_id, $this_id ) {
if ( class_exists( 'WC_Checkout_Field_Editor' ) ) {
$fieldgroups = array( 'billing'=>'billing_address', 'shipping'=>'shipping_address', 'additional'=>'additional' );
if ($resource != 'order' || empty($resource_id)) {
return $payload;
}
$order = wc_get_order( $resource_id );
foreach ($fieldgroups as $fieldgroup => $payload_group) {
foreach (wc_get_custom_checkout_fields($order , array( $fieldgroup ) ) as $field_name => $field_options ) {
//basic validation, is the field enabled
if ( !isset($field_options['enabled'] ) || ( $field_options['enabled'] != true ) )
continue;
//is the field for webhooks
if ( (!isset($field_options['display_options']) ) || ( !is_array($field_options['display_options'])) || ( !in_array('webhook', $field_options['display_options'])) )
continue;
//passed all checks, add to payload
$payload_value = get_post_meta( $resource_id, $field_name, true );
$payload['order'][$payload_group][$field_name] = $payload_value;
if ( is_array($payload['order']) ) {
$payload['order']['customer'][$payload_group][$field_name] = $payload_value;
}
}
}
return $payload;
}
};
/**
* filter add for above function
*/
add_filter( 'woocommerce_webhook_payload', 'filter_woocommerce_webhook_payload__custom_checkout_fields', 10, 4 );
/**
* filter action to add "profile" and "webhook" to selectable display options in custom options editing screen
*
* @param mixed $options
*/
function filter_woocommerce_custom_checkout_display_options__customer_checkout_fields_profile($options) {
$options['profile'] = __( 'Admin Profile', 'woocommerce-checkout-field-editor' );
$options['webhook'] = __( 'Webhooks', 'woocommerce-checkout-field-editor' );
return $options;
}
/**
* filter add for above function
*/
add_filter ('woocommerce_custom_checkout_display_options', 'filter_woocommerce_custom_checkout_display_options__customer_checkout_fields_profile', 10, 1);Select Field Placeholder text
↑ Back to topTo add a placeholder to a select field, use two vertical bars, sometimes called pipes, to separate the placeholder text from the option list. For example:
Choose a color || Red | Blue | Green
In this case, “Red” is the first option and will be selected by default. If you’d prefer the placeholder to be shown by default instead (with no option preselected), lead the options list with a pipe |, like this:
Choose a color || | Red | Blue | Green
This will display “Choose a color” as the placeholder, and none of the options will be selected by default.
Questions and Support
↑ Back to topSomething missing from this documentation? Do you still have questions and need assistance?
- Have a question about a specific extension or theme you’d like to purchase? Use our Contact us page to get answers.
- Have you already purchased this product and need some assistance? Get in touch with a Happiness Engineer via the qphmycoi.top Support page and select this product name in the “Product” dropdown.