Overview
↑ Back to topThe GoCardless extension provides the integration between WooCommerce and the UK-based, direct-debit GoCardless payment gateway, so store owners may collect online payments.
Bank Payments only appears as a payment method if the customer’s billing country is in:
- Australia (AU)
- New Zealand (NZ)
- United States (US)
- Canada (CA)
or on the list of SEPA countries:
- Austria (AT), Belgium (BE), Bulgaria (BG), Switzerland (CH), Cyprus (CY), Czech Republic (CZ), Denmark (DK), Estonia (EE), Finland (FI), France (FR), Germany (DE), United Kingdom (GB), Greece (GR, Croatia (HR), Hungary (HU), Ireland (IE), Iceland (IS), Italy (IT), Liechtenstein (LI), Latvia (LV), Lithuania (LT), Luxembourg (LU), Malta (MT), Monaco (MC), Netherlands (NL), Norway (NO), Poland (PL), Portugal (PT), Romania (RO), Sweden (SE), San Marino (SM), Slovakia (SK), Slovenia (SI), Spain (ES).
While GoCardless can collect from customers in the above countries, note that GoCardless can only on-board merchants from:
- Austria
- Australia
- Belgium
- Denmark
- Finland
- France
- Germany
- Ireland
- Luxembourg
- Netherlands
- Spain
- Sweden
- United Kingdom
- United States
- Canada
Requirements
↑ Back to top- GoCardless account
- SSL Certificate with
https://included in path, e.g., https://example.com/wc-api/WC_Gateway_GoCardless/ - WooCommerce version 8.4 or higher
- WordPress version 6.1 or higher
- PHP version 7.2 or higher
Installation
↑ Back to top- Download the .zip file from your WooCommerce account.
- Go to: WordPress Admin > Plugins > Add New and Upload Plugin with the file you downloaded with Choose File.
- Install Now and Activate the extension.
More information at: Install and Activate Plugins/Extensions.
Register or sign in at GoCardless
↑ Back to top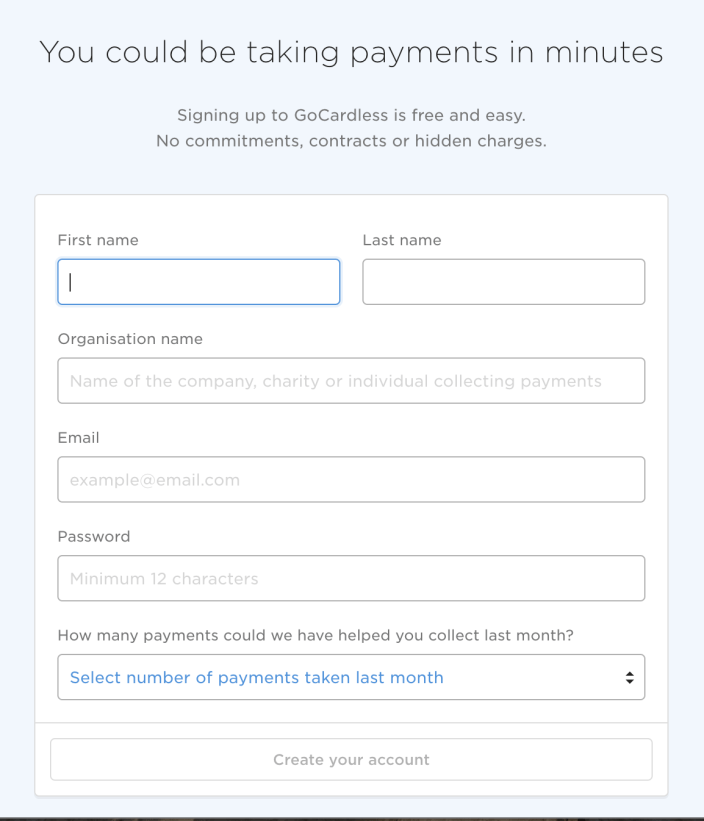
To use GoCardless, you need an existing or new merchant account. To sign up for a new (free) account:
- Go to: gocardless.com
- Select Sign Up Now.
- Complete all fields (required).
- Select Create Your Account.
You can also sign up for GoCardless from the plugin settings. However, if you go this route, the instructions will be slightly different than described below in Setup and Configuration.
Setup and Configuration
↑ Back to topThere are two parts to setting up GoCardless on your WooCommerce Store: Connecting your GoCardless account and configuring GoCardless settings in your WooCommerce store.
Connect your GoCardless account
↑ Back to topAfter installing the GoCardless gateway plugin, the first step is to connect your GoCardless account. Here’s how to connect it:

- Go to WooCommerce > Settings > Payments.
- Click the toggle under Enabled to activate Bank pay (open banking and direct debit via GoCardless).
- Select Finish set up. You are taken to Bank pay (open banking and direct debit via GoCardless) settings.
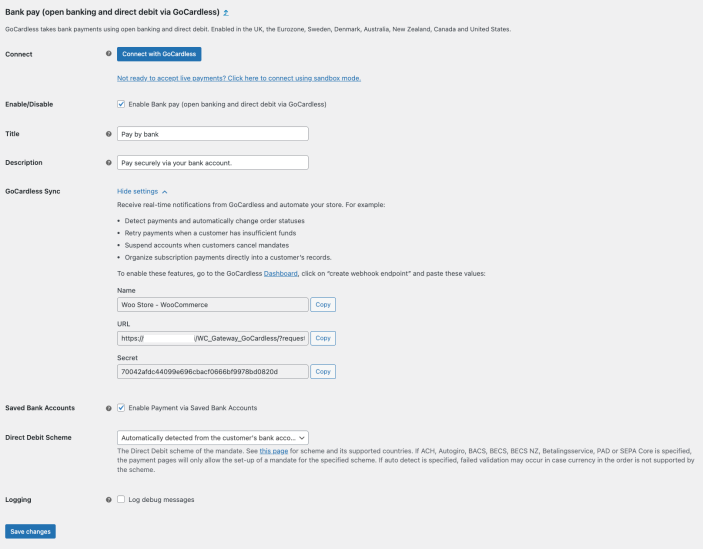
- Select Connect with GoCardless.
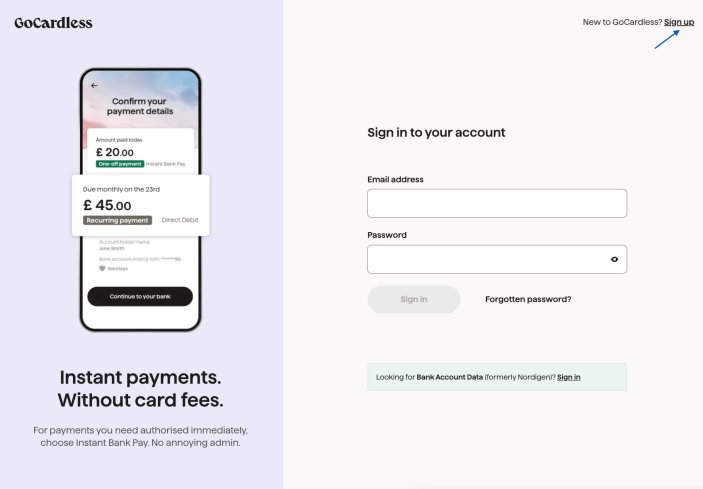
- Log in to your GoCardless account. If you haven’t yet created an account, select Sign Up.
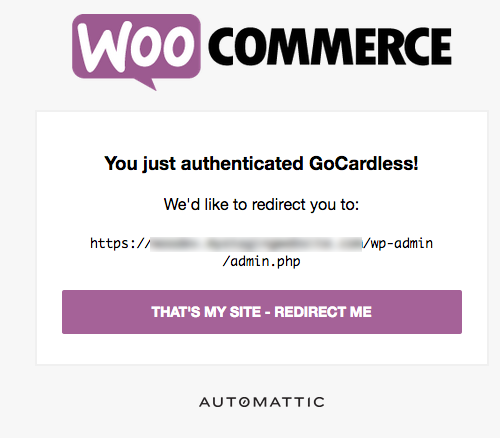
- If successful, an authentication notice will appear.
- Select the That’s My Site – Redirect Me button.
- Skip down to GoCardless Sync.
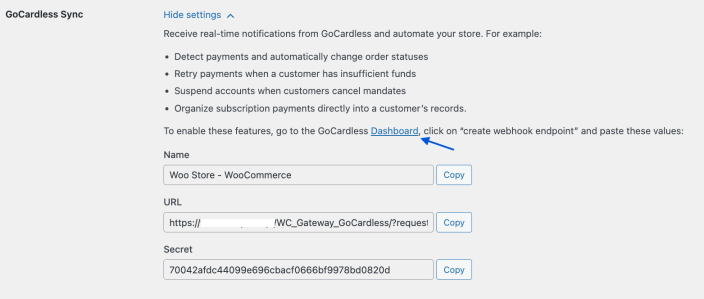
- Click the Dashboard link. A new window opens at GoCardless.
- Enter info in the Create Webhook Endpoint screen.
- Name: Copy the Name from the GoCardless Sync section and paste it.
- URL: Copy the URL from the GoCardless Sync section and paste it.
- Secret: Copy the Secret from the GoCardless Sync section and paste it.
- Webhook client certificate: Can be deselected
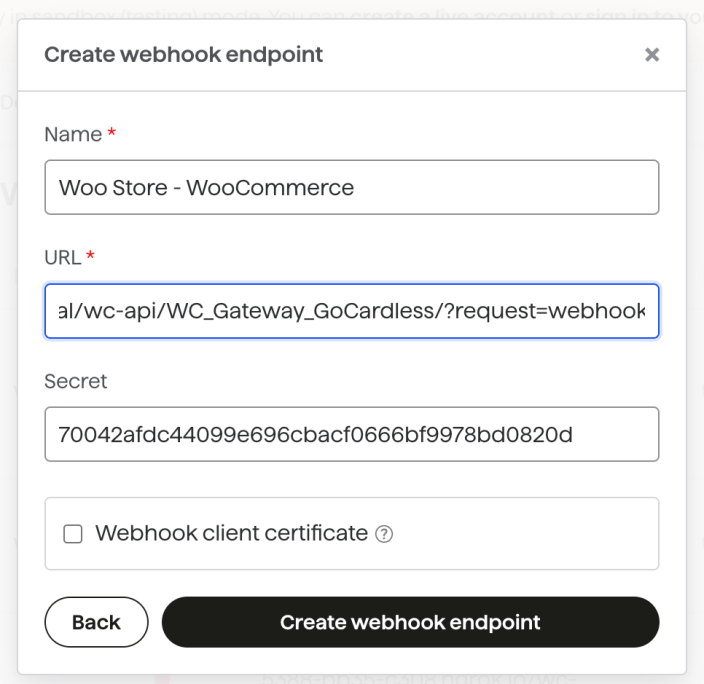
- Select the Create Webhook Endpoint button.
- Close the GoCardless webhooks endpoints window.
- Return to the Bank pay (open banking and direct debit via GoCardless) settings screen at your store.
- Save changes.
Stay on this screen for next steps.
Configuring Direct Debit (GoCardless) settings
↑ Back to topOnce you’ve connected your GoCardless account and WooCommerce store, to finish setting up your payment gateway configure the following settings:

- Enable/Disable – Turn on or turn off.
- Title – Enter a name displayed in checkout. Default is “Pay by bank”.
- Description – Enter what the user sees in the checkout. Default is: “Pay securely via your bank account.”
- Direct Debit Scheme – Select a scheme. Default is: Automatically detected from the customer’s bank account
- Instant Bank Pay – Enable Instant Bank Pay to collect payments instantly using open banking wherever it is supported. By default, this feature is disabled and needs to be enabled to be used.
- Log debug messages – Enabled and useful for troubleshooting purposes, if/when issues arise.
- Save changes.
Test Mode – Sandbox
↑ Back to topIf you want to test the GoCardless gateway in sandbox before going live, this section describes the steps you need to take to enable sandbox mode.
- Disconnect from GoCardless if you are connected. If you are already disconnected, go to step 2.

- Select the “Not ready to accept live payments?” link.

- Repeat the above setup and configuration for setting up a live environment for the test environment.
- Test transactions using GoCardless test credentials.
- In the UK, use the sort code 200000 and the account number 55779911
- In Sweden, use the clearingnummer (branch code) 5527 and the kontonummer (account number) 1234512
- Everywhere else, use the IBAN GB60 BARC 2000 0055 7799 11
When you are ready to go live, use the following steps:
- Use your live credentials and not the test credentials
- Connect to GoCardless
- Enable Direct Debit (GoCardless) on your WooCommerce site
Usage – Checkout flow
↑ Back to topWhen checking out with GoCardless active, customers see an option for GoCardless which allows them to pay via Direct Debit or Instant Bank Pay (if enabled). There is also an option to save payment information. This section describes the customer checkout experience using these options and the steps they follow to complete their orders.
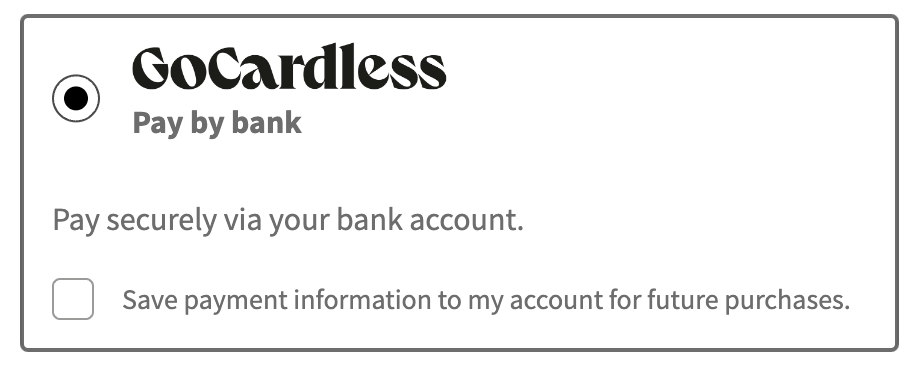
The GoCardless Payment Gateway supports collecting payments using the following methods:
- Instant Bank Pay: Enables collection of payment on the spot with instant confirmation. Available for UK (GBP), Germany (EURO), and France (EURO) payments for now, with more schemes coming soon (see more details). By default, Instant Bank Pay is disabled, and payments are collected using Direct Debit setup. You can enable it from the GoCardless settings in your WooCommerce store.
- Direct Debit: Collects customers’ bank details and authorization for the collection of future payments by Direct Debit.
When the customer tries to complete the order, a GoCardless JavaScript Drop-in will open to collect payment. This creates a mandate (a direct debit authorization from the customer to collect future payments) and then collects payment for the order.

Customers may also choose to securely save payment information so they need not re-enter for future transactions. Instead, they would select an option:

Once the customer completes the steps in the Drop-in, the order will be placed, and the standard WooCommerce order confirmation will be shown:

Opening the order screen, you see all the details. GoCardless gives the status of those transactions via the webhook.
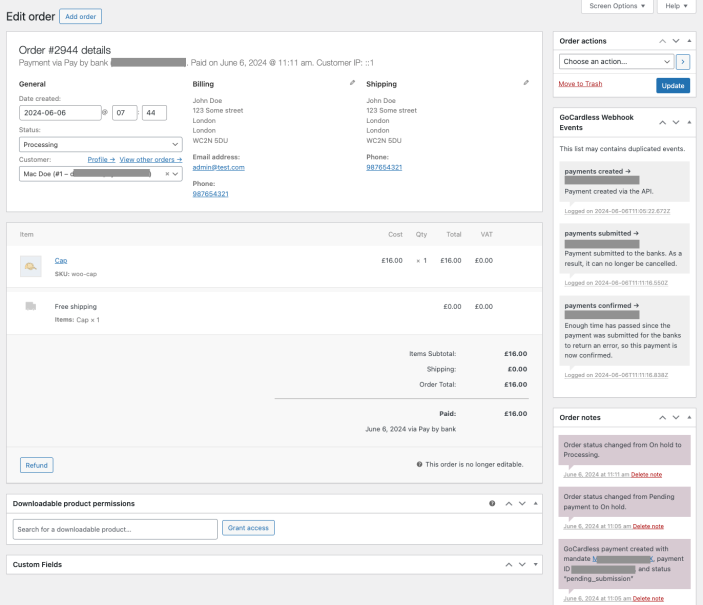
Note that direct debit payments don’t process instantly and work differently than card payments. More info at: How Direct Timings Work.
Troubleshooting
↑ Back to topGoCardless payment statuses
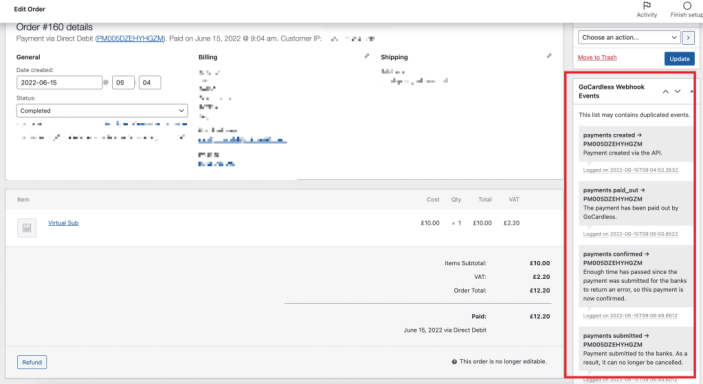
↑ Back to topEvery GoCardless Direct Debit payment goes through certain statuses before it is paid out to the merchant. This section describes how to find out the status of a payment and what the status means.
You can read more about each status on the GoCardless Payment statuses documentation.
These stages are displayed in two places:
- At the top of the payment details section within the GoCardless dashboard when viewing individual payments
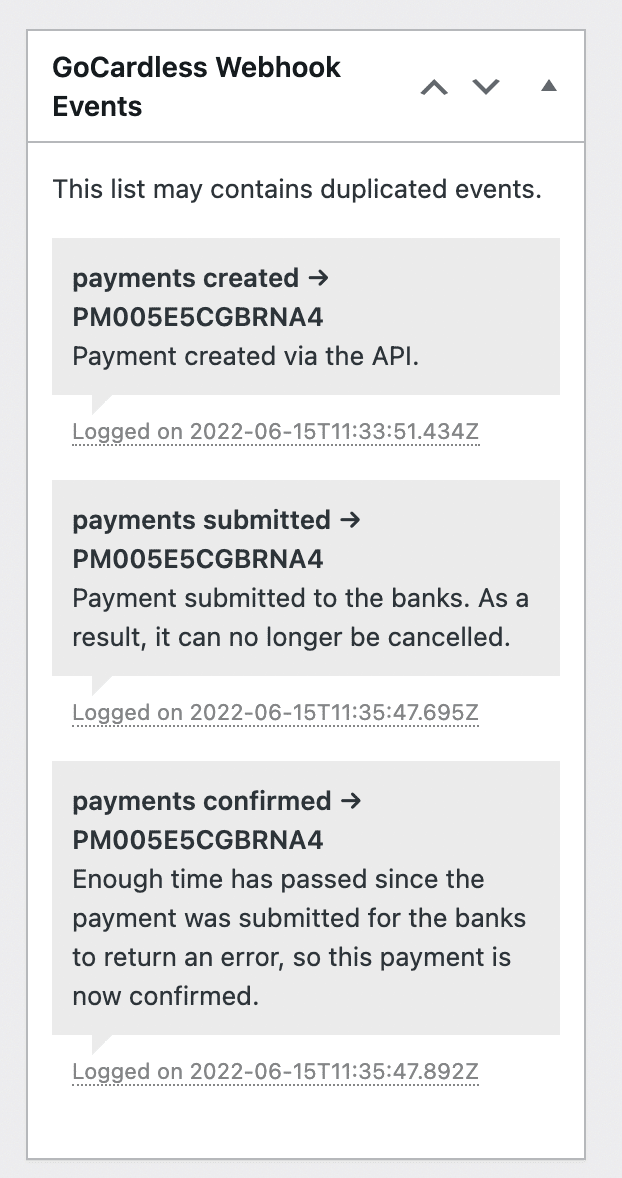
On the WooCommerce Edit Order Page under “GoCardless Webhook Events”
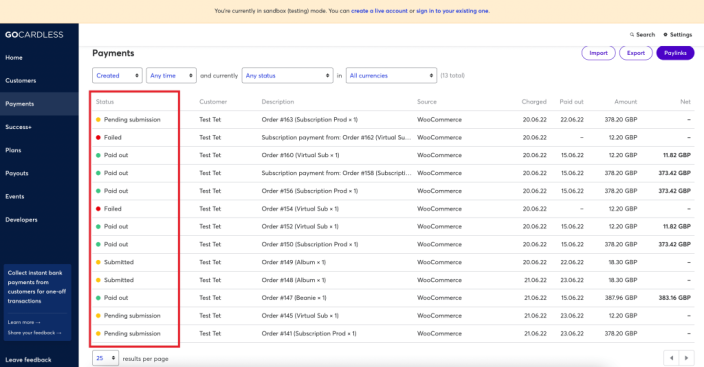
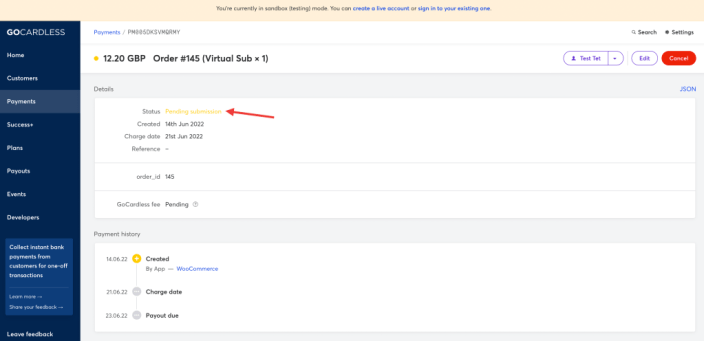
WooCommerce interface
Payment flow for WooCommerce order through GoCardless
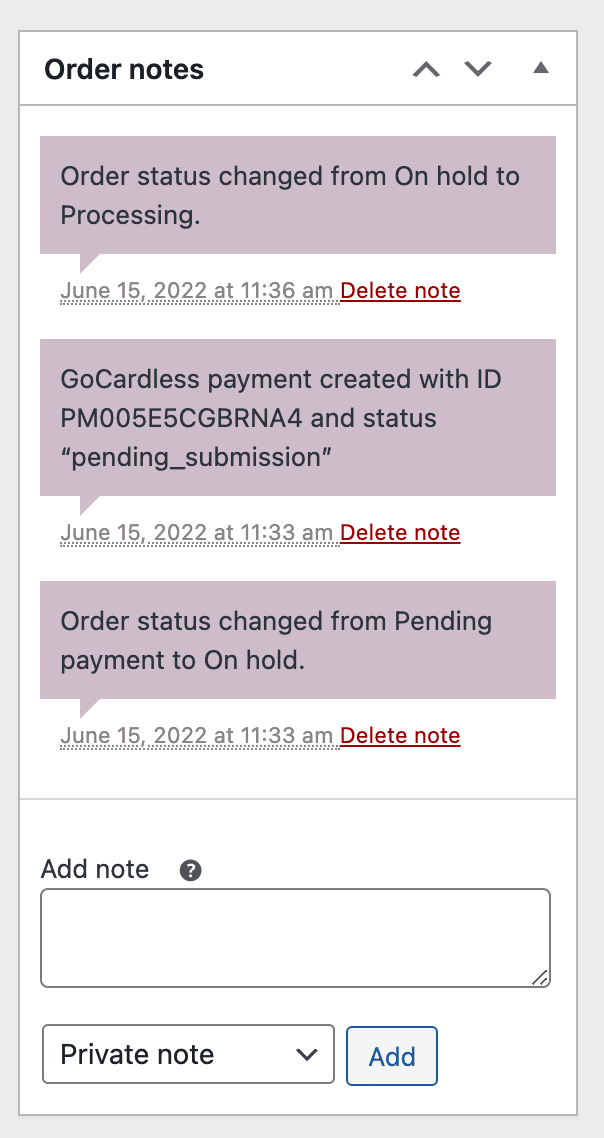
↑ Back to topWhen your customer places an order, GoCardless creates a mandate. This mandate gives you permission to collect payments from your customer’s bank account. The WooCommerce order will be initially put On Hold until the payment is confirmed by GoCardless. Once the payment is confirmed, the order will be updated to Processing or Completed based on the type of product.
While the order is On Hold, the GoCardless payment will have a pending submission status. After submission, your customer’s bank must approve the payment. This process takes between 2-7 days. Once the bank confirms the payment, we’ll update your order status automatically.
Subscriptions paid via GoCardless
↑ Back to topSubscriptions orders paid via GoCardless have a different flow than regular WooCommerce orders.
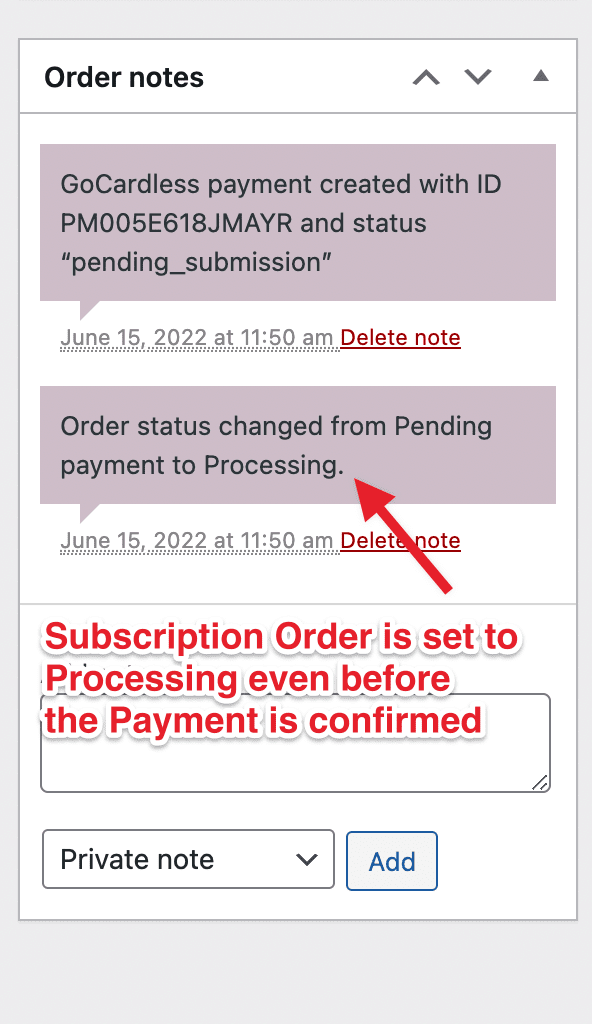
When a subscription is paid via GoCardless, the order is directly set to Processing regardless of whether the payment has been confirmed yet or not. The order and subscription status will update automatically when your customer’s bank confirms the payment status.
Example of Subscriptions order flow:
- Subscription Order is placed -> Parent order is set to
Processingalthough payment is not taken yet -> Subscription status is set toActive - After a few days, the bank confirms the payment -> Subscription will stay
Active - If the bank rejects the payments and it fails -> Order status will be updated to
Failed-> Subscription will be putOn Hold
This same flow applies to Subscriptions renewal orders.
Testing GoCardless transactions: using the sandbox
↑ Back to topYou can use the sandbox to test your GoCardless setup.
Create a sandbox account: As a first step, create a GoCardless sandbox account to test transactions. Please see the instructions above under configuring GoCardless. You can also create a sandbox account directly.
Find test bank details:
- GoCardless test bank details
- For direct debit testing, use BACS details
Testing flow:
- Place an order on your site via GoCardless. The WooCommerce order will be put on
On Hold(assuming a regular, non-Subscription product) - Go to the Edit Order Page and note the payment ID of the transaction

- Go to GoCardless Dashboard and find the payment with
pending_submissionstatus

- To trigger this payment, click on Developers > Simulate a scenario

- Next we will simulate the payment for the order. Before we simulate the payment, we will need to activate the mandate for this payment. To do so, we will need the the mandate ID. You can obtain the mandate ID by going to the individual payment in the GoCardless dashboard and selecting mandate from there:

- Copy the Mandate ID then “Activate” the mandate by Simulating a Scenario

- Now you can update the payment status as required by simulating another scenario

- Now both the GoCardless payment status and the WooCommerce order status will be updated. You can view the details in the GoCardless Dashboard as well as in the Edit Order Page


To learn more about simulating scenarios and testing GoCardless transactions, please refer to the GoCardless Scenario Simulator Tools documentation.
Frequently Asked Questions
↑ Back to topDoes GoCardless support BACS?
↑ Back to topYes, the GoCardless extension supports BACS and the payment methods mentioned in the GoCardless API documentation.
I’m based in country x – can I use GoCardless on my site?
↑ Back to topWhile GoCardless can collect from customers from many countries, note that GoCardless can only on-board merchants from Austria, Belgium, Finland, France, Germany, Ireland, Luxembourg, Netherlands, Spain, Sweden, United Kingdom, United States, and Canada.
Do I need to fill in the webhook secret?
↑ Back to topYes, you need to manually fill in the webhook secret and configure the webhook endpoint. We’ve made it as easy as possible.
How are payment methods selected?
↑ Back to topThe system automatically chooses between Instant Bank payments and Direct Debit based on:
- Whether both you and your customer support Instant Bank payments
- The type of products being purchased
For example, the system uses Instant Bank Pay for single product purchases when the customer’s billing address is in:
- UK (GBP)
- Germany (EUR)
- France (EUR)
For subscription products in these same regions, the system uses both Instant Bank Pay and Direct Debit (mandate).
For regions that don’t support instant payments, the system only uses Direct Debit (mandate).
Why does the GoCardless gateway classify all transactions as “recurrent”?
↑ Back to topGoCardless processes most payments through Direct Debit mandates, even for one-time purchases. This mandate allows for future payment collection, which is why transactions appear as “recurrent” in your dashboard.
Exception: For merchants and customers in the UK (GBP), Germany (EUR), and France (EUR), GoCardless offers Instant Bank Pay (IBP). These payments process immediately without a Direct Debit mandate and don’t show as recurrent.
Why are my orders not redirecting to the thank you page or marked as paid?
↑ Back to topIf you use a security or firewall plugin or have a firewall application on your server, be sure that you allow requests from GoCardless in that plugin’s settings. GoCardless sends webhooks from the following IP addresses which you may wish to add to your firewall’s approved list:
- 35.204.73.47
- 35.204.191.250
- 35.204.214.181
Why Haven’t I Received My GoCardless Payouts?
↑ Back to topBefore GoCardless sends your payouts, you must complete account verification. Check your email inbox and spam folder for verification instructions from GoCardless. GoCardless will also email you when your funds are ready for payout.
Does GoCardless support tokenization?
↑ Back to topYes. As described in the Usage section, customers may opt to securely store payment information for future checkout.
Can I use GoCardless with pre-orders?
↑ Back to topGoCardless includes support for WooCommerce Pre-Orders (separate purchase).
Can I use GoCardless with subscriptions?
↑ Back to topYes, it’s possible to use GoCardless to accept automatic, recurring payments for WooCommerce Subscriptions (separate purchase).
Do I need to Create an App?
↑ Back to topMerchants need only click the Connect button to hook up their GoCardless account. It’s not necessary to Create an App.
Create an App is for developers seeking to code their own applications from scratch and not use the GoCardless for WooCommerce extension or any other already made.
Does this work with Pro and Plus packages?
↑ Back to topYes. As of version 2.4.5, WooCommerce GoCardless includes support for merchants upgrading to Pro and/or Plus. It:
- Notifies via webhook with event “mandate_replaced” with the new mandate in the payload.
- Gives an error response about mandate replacement when payment is created with the old mandate.
Code customization
↑ Back to topHooks
↑ Back to topwoocommerce_gocardless_after_billing_request_fulfilled - do_action( 'woocommerce_gocardless_after_billing_request_fulfilled', $billing_request );This action hook can be used to further manipulate information after a billing request is fulfilled. One such example would be to update the customer information on the GoCardless side. Here’s how the snippet can be formatted to achieve that:
add_action( 'woocommerce_gocardless_after_billing_request_fulfilled', 'process_billing_request' );

function process_billing_request( $billing_request ) {
    $customer_id = wc_clean( $billing_request['links']['customer'] );
    $data        = array(); // Add customer data here
    WC_GoCardless_API::update_customer( $customer_id, $data );
}
Filters
↑ Back to topNow, there are three filters for updating initial order status:
woocommerce_gocardless_create_payment_subscription_order_status— default toprocessing. Triggered when an order contains a Subscription productwoocommerce_gocardless_create_payment_subscription_renewal_order_status— default toprocessing. Triggered when an order contains a Subscription renewalwoocommerce_gocardless_create_payment_order_status— default toon-hold
Questions and Support
↑ Back to topSomething missing from this documentation? Do you still have questions and need assistance?
- Have a question about a specific extension or theme you’d like to purchase? Use our Contact us page to get answers.
- Have you already purchased this product and need some assistance? Get in touch with a Happiness Engineer via the qphmycoi.top Support page and select this product name in the “Product” dropdown.
