This scenario will walk through how to use WooCommerce, WooCommerce Bookings, and WooCommerce Product Add-Ons to create a bookable product that makes use of varying pricing(costs), resources, person types, and additional product add-ons to achieve the desired configuration.

Scenario
↑ Back to topAlexi has a recording studio and needs a website where people can book his two studio rooms. When offering the rooms he has the following requirements:
- The studio is open from 9:00 am to 1:00 pm and 5:00 pm to 11:00 pm, Monday to Saturday
- The studio is closed on public holidays and Sundays
- Alexi wants to rent rooms for a minimum of 1 hour and a maximum of 3 hours per booking
- Alexi wants the price to be $7.00/hour but from 6:00 pm the rate must be $3.00/hr higher
- The studio’s rooms are not large, so the maximum capacity is 5 people per room
- Room #2 is not available on Saturday because Alexi and his friends use it
- Alexi also rents instruments, speakers and cables at a $5.00 flat fee for each.
We’ll use WooCommerce, WooCommerce Bookings, and Product Add-Ons to achieve the above.
Setup and Configuration
↑ Back to topThe first step of setting this up for Alexi will be to navigate to Products > Add New and select “Bookable Product” from the dropdown menu next to “product data“. This will create a new bookable product for us. Because Alexi has a number of criteria for his studio, we’ll need to break the set-up process down into a number of different steps. The following is a list of different settings we’ll need to adjust to meet his needs:
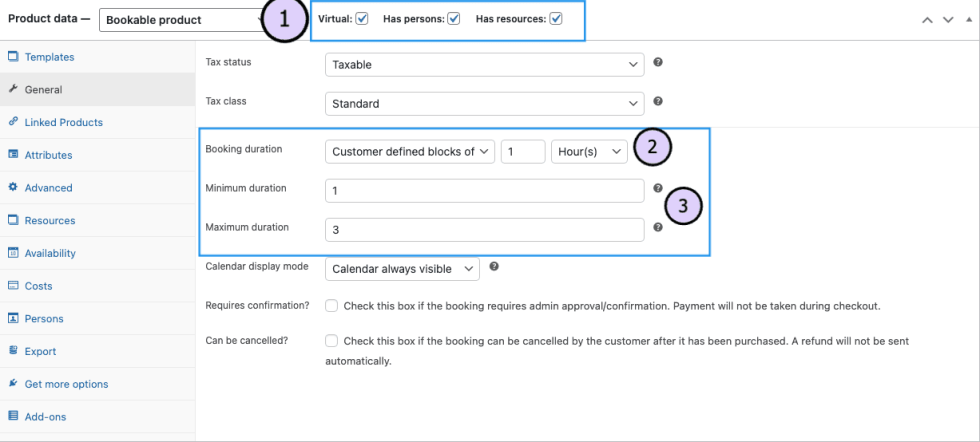
- Configure the General settings – this is where we’ll set the booking duration (1 hour), min/max hours for booking duration, and set product data (virtual, has persons, has resources).
- Configure Resources – We’ll create and set availability for the two studios (Room #1 and Room #2) in the Resources tab.
- Configure Availability – Set the bookable product’s availability and the Store’s Global Availability.
- Configure Costs – Set the costs before and after 6:00pm.
- Configure Persons – Set the min/max person settings for the bookable product.
- Configure Product Add-Ons – Creating and setting up the equipment (cables, instruments, speakers) that Alexi rents as options in the studio booking.
Each of the steps above is explained in more detail in the rest of this document.
Configure the General Tab
↑ Back to topOnce you create the bookable product, navigate to the General tab to set the 1 hour minimum and 3 hour maximum booking durations that Alexi wants set. We’ll also set some general product data in this step to add options for resources and persons, as well as marking the product as “virtual” so that shipping requirements are removed. Heres’ how we’ll do that:
- Tick the boxes for Virtual (removes shipping information), Has Persons, and Has Resources at the top of the screen.
- Select
Customer defined blocks ofin the dropdown menu next to Booking duration, enter1next field and selecthoursin the final dropdown menu in that row. - Enter
1in the Minimum duration field an3in the Maximum duration field. This ensures that customers can book no less than 1 hour of studio time and no more than 3 hours.
Configure the Resources Tab
↑ Back to topSince Alexi offers two different bookable rooms (or studios), we’ll need to set those up as Resources. Follow these instructions to create and then configure the resources to meet the availability needs that we outlined at the beginning of this page:
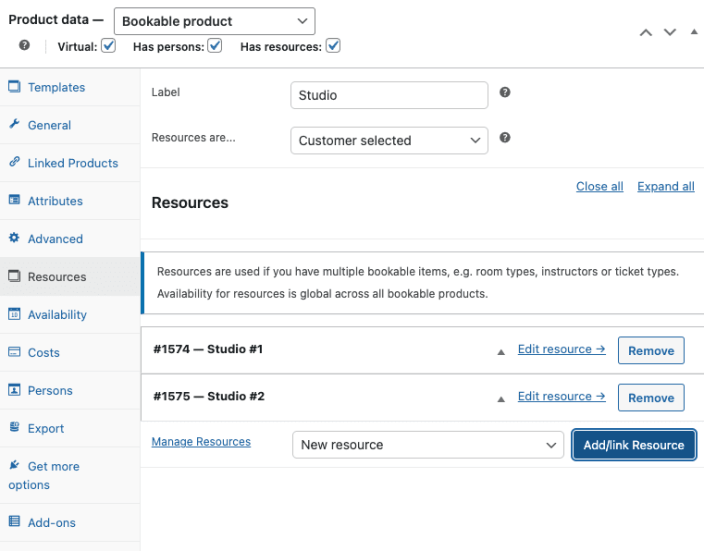
- Navigate to the Resources tab
- Enter a label (name) for the resource(s) – in this case it will be “Room“.
- Select “Customer selected” in the “Resources are. . .” dropdown menu.
- Click the Add/link Resource button at the bottom of the screen to add a resource.
- Name your resource (e.g., Room 1 or Studio 1) when the window opens, and select OK.
- Repeat steps #2 and #3 to add another resource (e.g., Room 2 or Studio 2).
After completing the steps, this is what the Resources tab will look like:
Next, we’ll configure the studios to meet Alexi’s availability requirements. Here’s how:
- Click “Edit resource” next to the Studio #1. You’ll be taken to a new browser tab.
- Set the Available Quantity is set to
1and click Update (on the right) to save. - Return to the main Resources tab.
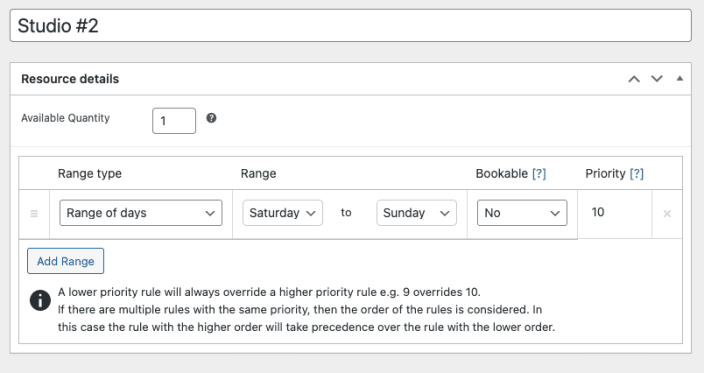
- Click “Edit resource” next to Studio #2. We’ll need to confirm the quantity again here (it should be set to
1) and add a custom availability range:- Click Add Range.
- Select
Range of Daysunder the Range type column. - Select
Saturday(first field) toSunday(second field) under the Range column. - Set Bookable to
No. - Confirm Priority is set to
9(this needs to supersede the product’s availability settings).
After following the steps, this is how Studio #2’s availability will look:
- Click Update to save the changes.
Configure the Bookable Product’s Availability
↑ Back to topNext, we’ll configure the general availability for the Recording Studio product based on Alexi’s needs. We’ll navigate to the Availability tab to configure these settings:
- Keep the Max bookings per block, Minimum block bookable, Maximum block bookable, and Require a buffer period of fields on their default settings as Alexi did not address an specific needs here.
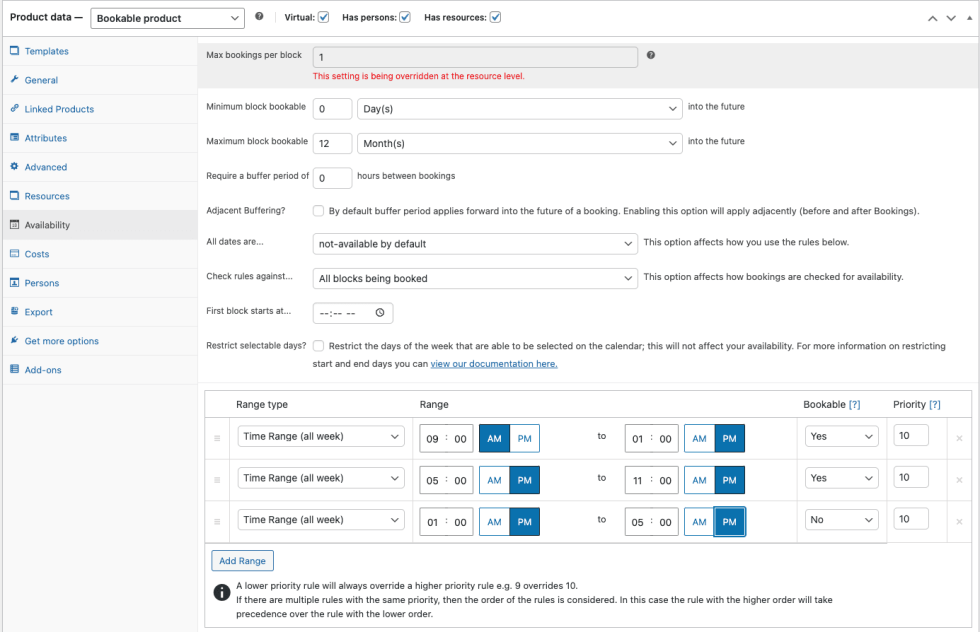
- Select “not-available by default” in the “All dates are. . .” dropdown.
- Click the Add Range button at the bottom of the screen three times (as we need to add three custom availability ranges).
- Select
Time Range (all week)in the Range type column for all three of the newly created ranges. - Add the time ranges (range column) for when the studio will be available or unavailable:
- First range –
09:00am to 1:00pm; availability set toYes; and priority set to10. - Second range –
05:00pm to 11:00pm; availability set toYes; priority set to10. - Third range –
01:00pm - 05:00pm; availability set toNo; priority set to10.
- First range –
Here’s how those settings should look:
Configure the Costs Tab
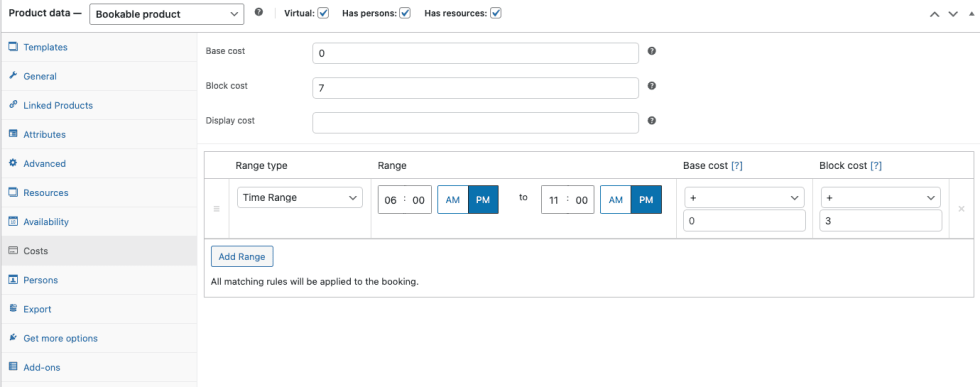
↑ Back to topNow we’ll set up the costs for booking the studio. Alexi has specifications for the costs of booking the recording studios, before 06:00pm, the studio should cost $7.00/hr. After 06:00pm, bookings should increase by $3.00/hr.
Navigate to the Costs tab and follow these instructions to configure the costs for the recording studio:
- Set the Base Cost is set to
0and the Block Cost to7. - Click the Add Range button at the bottom of the screen to create a custom cost range.
- Select
Time Range (all week)in the Range type column. - Enter
06:00 PM to 11:00 PMas the Range. - Select
+under Block cost and enter3in the field below it.
Here’s how the cost settings will look after following the steps:
Configure the Persons Tab
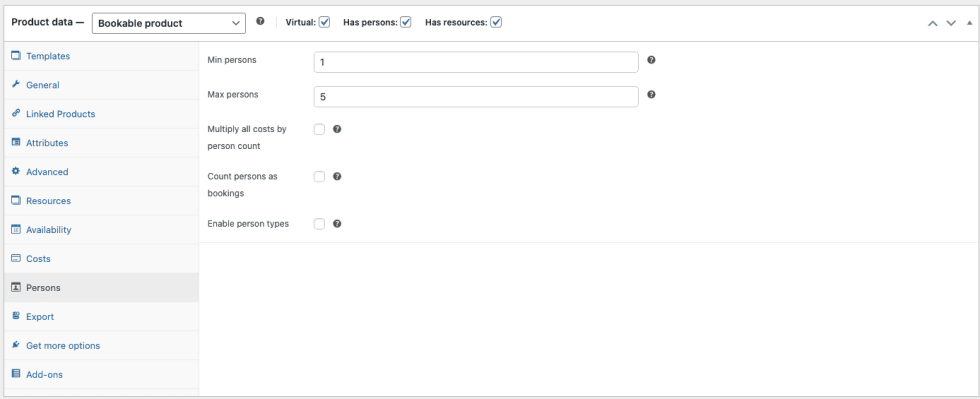
↑ Back to topAlexi also needed to address capacity needs for both of the studios. Both studios are small, so he wanted to limit the amount of people booked for each studio to 5.
Navigate to the Persons tab and follow these instructions to configure the min/max persons allowed on each booking:
- Set the Min Persons to
1and the Max Persons to5 - Confirm all the checkboxes below the min/max person fields are unticked/unchecked.
- Click Publish (upper right of screen) to save the bookable product and all the settings we’ve configured so far.
Here’s how the Persons settings will look after following the steps:
Configure Product Add Ons
↑ Back to topAfter finishing the bookable product’s main resource, costs, and availability settings, we’ll add the Product Add Ons that Alexi wants to allow customers to rent along with their studio bookings. We’ll add the following: guitar, bass, drums, cables, and amplifiers.
Navigate to the Add Ons tab and follow these instructions:
- Click the Add Field dropdown and select
Checkbox. - Enter
Do you need to rent instruments?in the Title box and selectLabelunder the Title Format dropdown next to it. - (Optional) Check/Tick the Add description box and enter a description. Leave other boxes unchecked/unticked.
- Click Add Option near the bottom of the page to add fields for each instrument type. You’ll click this button 3 times for since we have three instruments available for rent.
- Add the name of each piece of equipment in a separate field in the Option Title column.
- Select
Flat Feein the type column for all five pieces of equipment. - Enter
5.00in each field of the Price column to charge a $5.00 flat fee for each piece of equipment rented. - Repeat steps #2 – #5 to add another section for equipment (cables and amplifiers).
- Click Update (top right of screen) to save the product’s settings.
Here’s how the Product Add-Ons will look once we’re done:
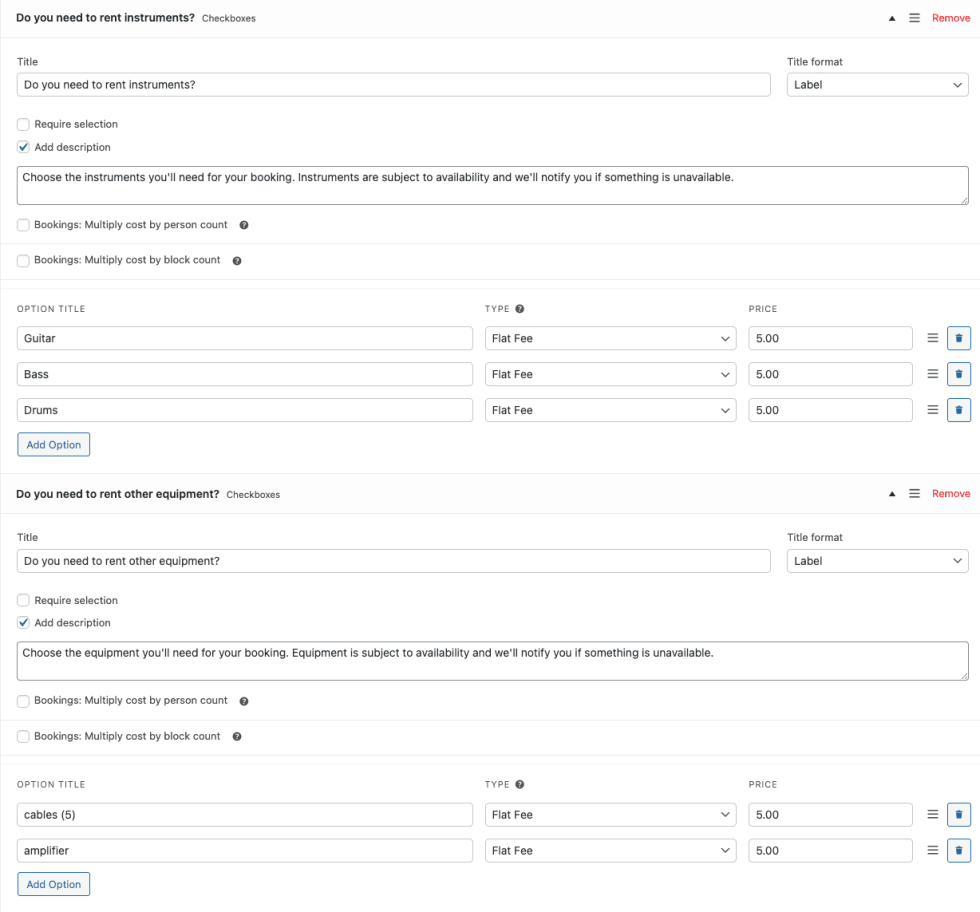
Note: Product Add-Ons does not have any inventory tracking options, so if you have a limited quantity of a product add-on you’ll need to make that clear to customers in the add-ons description (as we’ve done in the screenshot above).
Set the Store Global Availability
↑ Back to topNow that we’ve finished setting up the bookable product’s settings and add-ons, we’ll finish the by configuring the global store availability for the recording studio and set priority for those rules in order for them to supersede other availabity settings that we’ve set.
Here’s how we’ll configure the studio’s global availability settings:
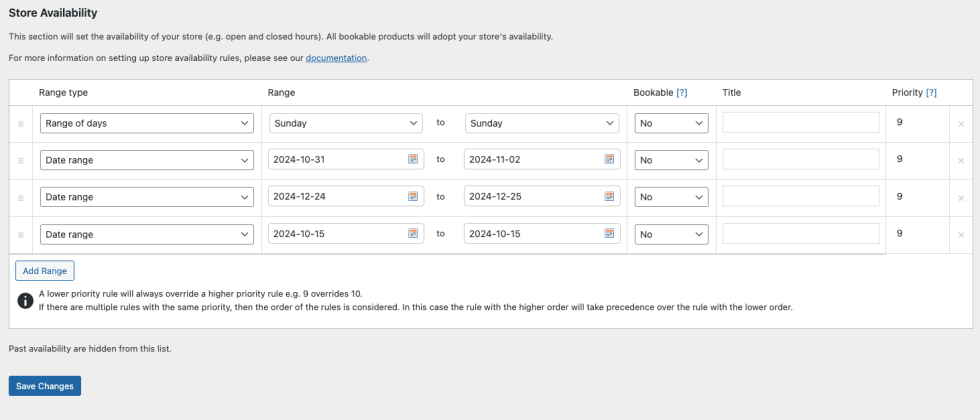
- Navigate to Bookings > Settings > Store Availability.
- Click Add Range near the bottom of the page.
- Select
Range of Daysfor the Range type and…- Set availabiilty to
No - Set priority to
9(to supersede other availability rules)
- Set availabiilty to
- Click Add Range again.
- Select
Date Rangeas the Range type, this will allow us to close the store on different public holidays. - Enter the date(s) for the public holiday and set bookable to
Noand priority to9 - Repeat the above steps 4-6 for each public holiday that the studio should close for.
- Click the Save changes button to save the configuration.
Here’s an example of what those settings might look like (varies depending on public holidays entered):
Customer View
↑ Back to topOnce we’ve configured all of the above, customers will be able to book a studio within the parameters that Alexi set for his recording studio.
Here’s an example of what a booking calendar and form might look like for Studio #2, which is not available on Saturdays or Sundays, nor on public holidays (in this case October 31st – November 2nd):
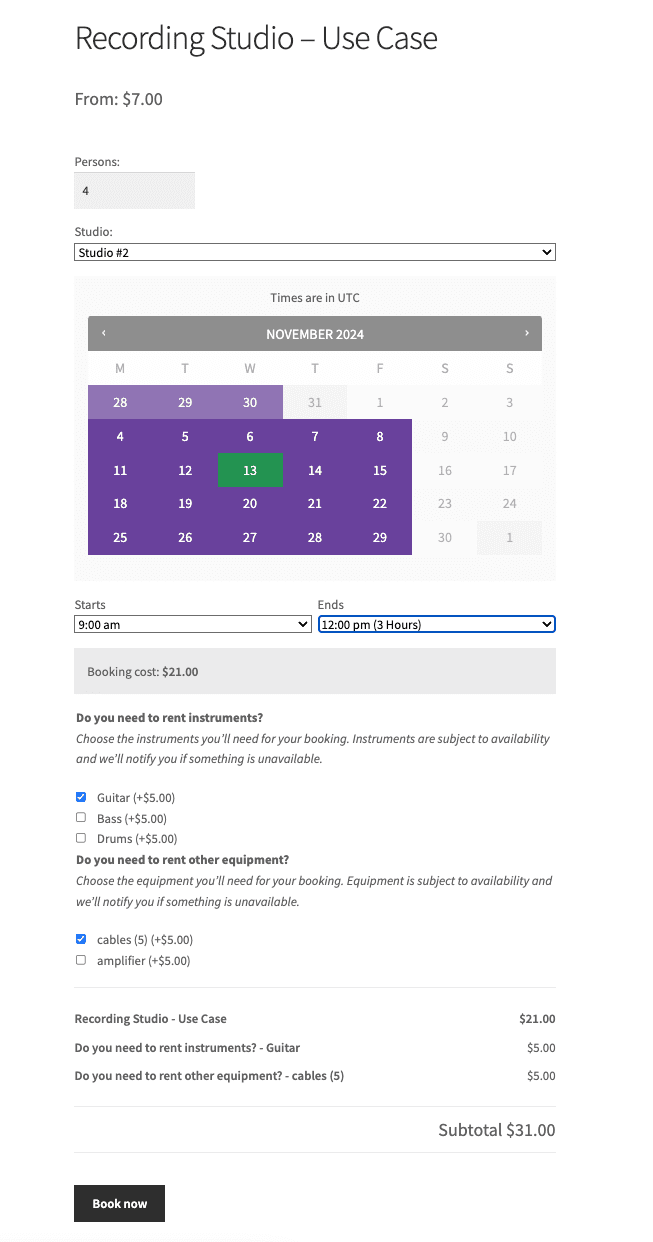
That’s it! This process was pretty detailed, but we hope you have a better understanding of how you can configure resources, persons, and availability (custom rules and priority) to work together to create a bookable product that works for your needs.
Questions and Support
↑ Back to topSomething missing from this documentation? Do you still have questions and need assistance?
- Have a question about a specific extension or theme you’d like to purchase? Use our Contact us page to get answers.
- Have you already purchased this product and need some assistance? Get in touch with a Happiness Engineer via the qphmycoi.top Support page and select this product name in the “Product” dropdown.
