People like fast sites; search engines like fast sites. Everyone on the Internet likes fast-loading sites.
Think about how you use the web: If you’re specifically looking to purchase something, waiting even 10 seconds for a page to load can be insanely frustrating.
As an eCommerce site owner, how can you easily improve the speed of your online store?
By optimizing all of your images for web.
Why is this important? How do you get started, and what do you have to do? You’ll find answers to all of these questions below.
Why does site speed matter when it comes to your online store?
↑ Back to topAccording to Kissmetrics, 79% of web shoppers who have trouble with website performance say they won’t return to the site to buy again. That’s a large percentage.
Search engines penalize online stores that load slowly – but more importantly, so do users. They leave the site without buying, never to return.
If your site isn’t loading as quickly as possible, you could be losing out on sales.
How fast should your site be?
↑ Back to topAs fast as possible.
That may sound vague, but consider these stats:
- 47% of people expect a web page to load in two seconds or less.
- 40% of visitors will abandon a page that takes three seconds or more to load.
Need I say more?
Website visitors aren’t waiting ages for a page to load, nor should they have to.
How can you find out the speed of your website?
↑ Back to topThere are a couple of free tools available online that will scan your site and give you a speed score, along with a step-by-step breakdown of the biggest problems and how to improve them.
- Page Speed Insights by Google lets you know how your site loads on both desktop and mobile.
- Pingdom Page Speed explains your page size and load time.
- GTMetrix includes helpful visuals and prioritizes speed concerns.

So how do you speed up your online store?
↑ Back to topOne of the best places to start is by optimizing your images for web.
Images take up more space then any other part of a website, especially when it comes to online stores.
They’re some of the “heaviest” and most difficult files for a server to work with, and their size and quality can make or break your web performance.
That, in turn, impacts how long people stay on your site and how many of them convert.
Lighter images lead to a faster site, happier customers, and more sales. So where do you start?
Step 1: Save your image in the correct format
The two most common image formats to use are Portable Network Graphics (PNG) and Joint Photographic Experts Group (JPEG or JPG).
What’s the difference?
In short, PNGs are better quality and allow for transparency, but their image file sizes are larger. JPEGs aren’t as good in the quality department, but their image file sizes are usually a lot smaller.
PNGs are also non-lossy, meaning you can edit and save an image a dozen times over and the quality won’t degrade. JPEGs, on the other hand, are lossy and degrade in quality each time you resave.
When should I use each format?
JPEGs will be your best bet in most cases as they’re a good compromise between image quality and file size.
As a good rule of thumb, here’s a breakdown of when to use each format.
- When to Use PNG:
- For images with transparent backgrounds
- For images with opacity
- For smaller images such as logos or icons
- For images with text on them
- For screenshots or images that don’t use a lot of different colors
- When you want to retain the quality of a detailed image and file size doesn’t matter
- When to Use JPEG:
- For images with a lot of different colors, like photographs and realistic images
- For product images and backgrounds
Step 2: Resize Your Image
When you upload an image that’s 3,000 pixels wide to your product page, you’re making the browser work twice as hard.
The browser has to first load the original 3,000 pixel image, and then reload the image sized down to fit the area that it’s uploaded to.
For example: If the width of your website content is 800 pixels, your visitors’ browsers have to load the 3,000 pixel image plus the 800 pixel image.
Multiply that process by the number of images you have on a single web page. See how that can quickly turn into a pretty monstrous problem?
Before uploading any image to your website, first double-check the size that you’ll need.
On this WooCommerce website, for example, the product images display at 460px x 460px.

Important: Image file size and Image size are two different things.
The image size (460px x 460px) is shown in the screenshot above.
The image file size is how big the actual file is (such as 92,461 KB). This is the amount of space required to store the image on your server. The larger the file size, the longer it takes for the image to load.
You want to make sure that most images on your websites are no larger than 150 KB, but preferably less than 100 KB – depending on the purpose of that image
How do you find out what image size is needed?
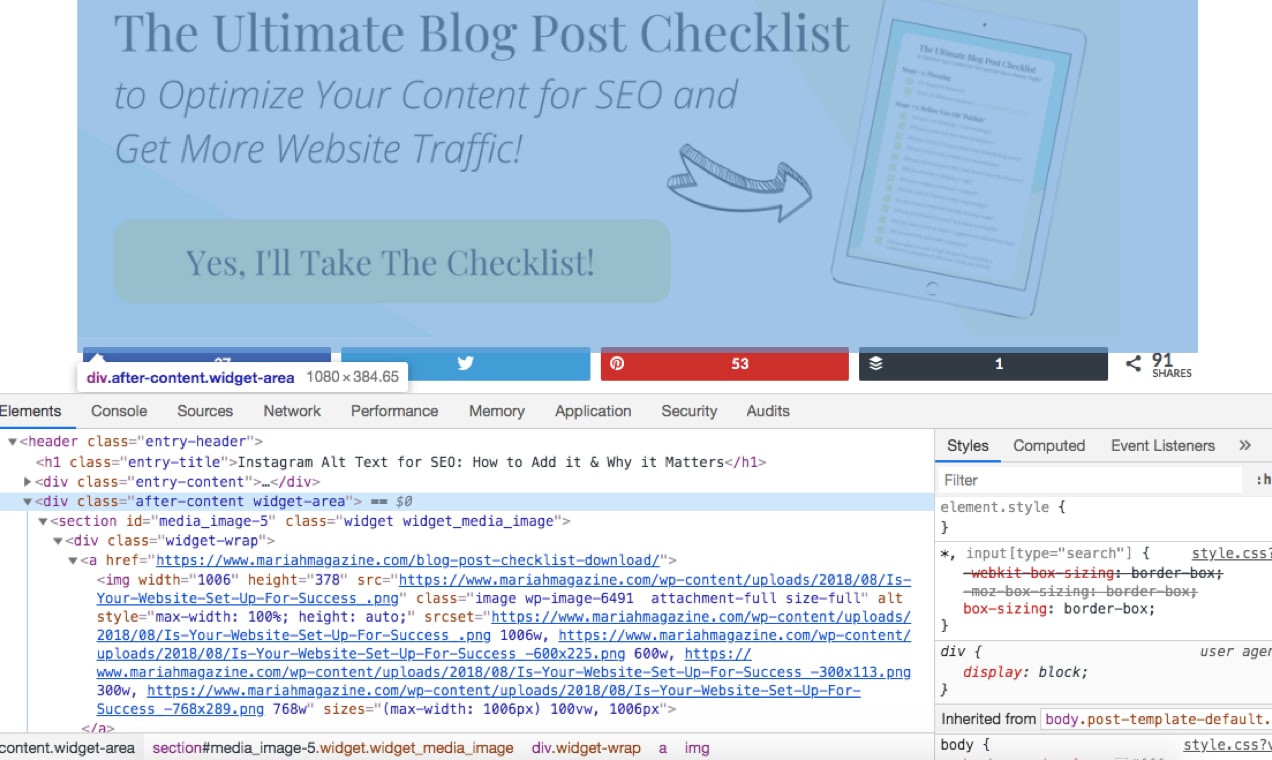
If you’re using Google Chrome, you can use the Inspector tool to help you figure out the size of the space for your image.
Navigate to your site and right-click on the area you want to investigate the width of. Then click “inspect”.
A toolbar will pop up at the bottom. You’ll be able to sort through the HTML sections of your website, hover over them, and see the width of that section.
So, for example, if you want to add an image to your blog post, you need to know the max-width of your content area so you can upload an image to be that size or smaller.
Open the inspector tool to determine the space for your image. In the example below, the size of the area that your image will occupy is 1,080 pixels wide. Now you know that, in order to prevent the web browser from loading two different-sized images (as mentioned above), you have to resize your image to be 1,080px wide or smaller.

Step 3: Save Your Image for the Web
Most image editing software has a “save for web” option which helps adjust the file size of the image.
To “Save for Web” in Photoshop, go to File > Export > Save for Web from the menu bar at the top of your screen.

Your software will usually allow you to toggle an image quality bar in order to find a happy medium between file size and image quality.
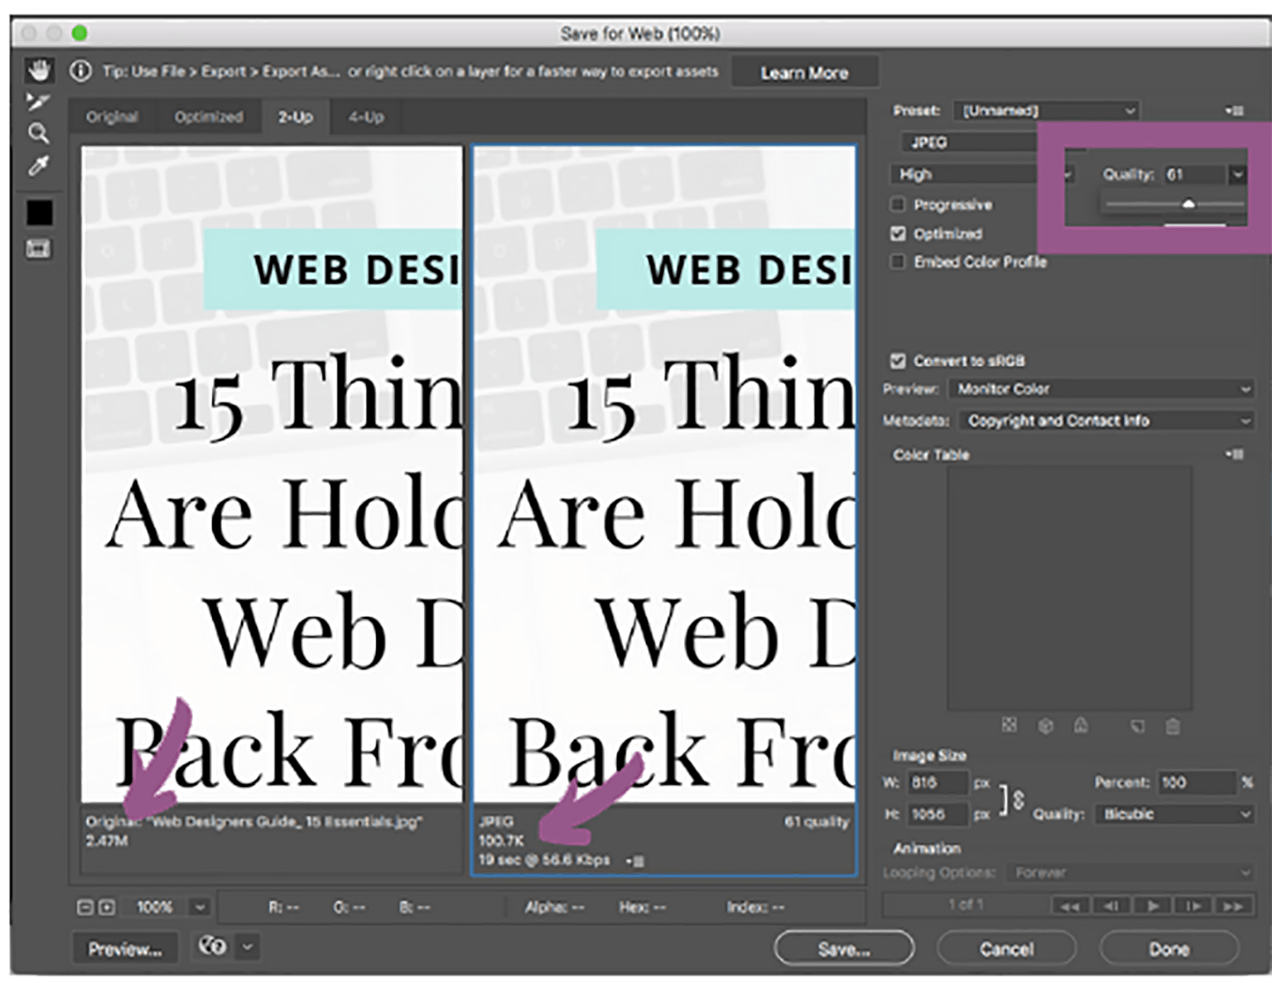
In Photoshop, you can view your image on a side-by-side screen where the original image is on the left, and the new saved image preview is on the right.
In the screenshot below, I’ve highlighted the image quality toggle bar. You’ll want to adjust the image to the lowest file size possible while keeping an eye out for image quality.

The arrows in this screenshot point to the image file size. Notice that the lower the quality gets, the smaller the file size becomes.
Keep in mind that you don’t want grainy, pixelated images either. That’s why it’s important to review the preview on the right-hand side before saving your image.
Other image editing tools that have this option:
- Sketch: https://www.sketch.com/
- Pixlr: https://pixlr.com/
Step 4: Run the Image Through a Compressor
Image compressors strip an image of unnecessary information such as camera details, metadata, color profiles, embedded thumbnails, etc.
Doing this decreases the file size of your image, without affecting its quality.
You can use a WordPress plugin such as Smush Image Compression and Optimization or EWWW Image Optimizer to bulk compress or automatically compress images when you upload them to your website.
If you have a Mac, download ImageOptim for free – a super easy drag-and-drop app. You can also take advantage of free online image compressors like TinyPNG or Kraken.
Don’t Have Time To Follow All These Steps?
There is another option: use Jetpack’s free Content Delivery Network.
Jetpack comes with a free Content Delivery Network (CDN) called Site Accelerator that will automatically resize, compress, and serve your images from high-speed data centers located all over the world.
It’s easy to set up via one-click install and provides additional benefits such as speeding up the delivery of your CSS and Javascript files.
To set it up:
- Install the free Jetpack plugin if you’re not already using it.
- Go to Jetpack > Settings > Performance in your Dashboard.
- Scroll to the Performance & Speed section, and toggle Enable Site Accelerator.
Done! Image acceleration features apply to existing and new images, so you’ll start seeing increased speed right away.
You may also want to take advantage of Jetpack’s Lazy Images feature. Lazy Images loads only images visible on the page to site visitors, delaying the loading of offscreen images until a user scrolls down. This is especially helpful on mobile devices, where bandwidth is a concern. To activate:
- Go to Jetpack > Settings > Performance.
- Scroll to the Performance & Speed section.
- Toggle Lazy loading for images.
In conclusion
↑ Back to topOnline stores need to pay special attention to their image sizes as these images are critical for selling their products.
Remember to keep your image file sizes as small as possible without sacrificing quality. It’s one of the easiest ways to improve your store’s speed and help you convert more of your traffic into sales.
About


A wonderful guide to optimize the images. Thank you
Thanks, Ashraf! Glad you found it useful!
Thanks for sharing! I’m using WP-Rocket!
WP Rocket is an excellent choice for speed optimization! It makes it easy to find the right combination of features to make your site load quickly. Thanks for reading!
I am using smush and was used jetpack but no any improvement in speed of my website. Is there any other solution?
Hi Mujeeb,
There are a lot of factors that impact a website’s speed beyond image file size. I would recommend running your site through a tool like Google PageSpeed, GTMetrix, or Pingdom Website Speed Test to understand what else might be impacting your load time.
GTMetrix is the one we use, so easy as it gives you the files to download, which have already been compressed for you!
I love GT Metrix as well! They make it easy to prioritize optimization opportunities and, I agree, the compressed files are very helpful.
I’m using MaxCDN, WP Rocket and Shortpixel. Though, MaxCDN does the job alone but its always good to have specific plugins for specific work. The guide is helpful. Thanks!
Those are great tools! I agree – plugins that specialize in specific functionality often provide the most effective solutions.
Nice post. I am working website speed up since 2010. I can see all the my customers website have images issues and not using CDN. Making sure under 100kb product image is most important. It’s bit difficult to make under 100kb if product images have background. So maybe it’s good idea to remove background and Optimize under 100kb?
Thanks for your question, Mejba! Under 100kb is great but, really, if it’s between 100-200kb, I would still consider that well within a safe range. You have to strike a balance between a high-quality image of your product and the image file size.
It’s also important to consider what’s most beneficial to your customers. Is the product background valuable and does it provide context or interest to your image? Having the perfect image that represents the product you’re selling may be more important than a few kb.
Excellent Article. We are currently using WP Smush, Cloudflare and Fastest web cache. Will give this a try.
I’m glad you found it helpful! We’re always eager to help!
Actually your advice really works for me well, thanks